


killshotroxs
Established Member
- Impact
- 111
Alright, folks today I am going to tell you,
But first let's talk about Requirements meaning what you're gonna need to set this up.
1) A Domain Name
2) A Cloudflare account
3) A Gmail Account
For most of you here you will already be having number 1 and 3 but not number 2 but hey don't worry it's very easy and intuitive to get a free account at any of the service mentioned above.
Once you make a free cloudflare account, you need to go to "Onboard a domain" section, here you need to enter your domain and click continue.

For those of you who don't have a domain, you can get it from anywhere, my favourite provider is Porkbun so i am gonna show you how to get a name from porkbun, you just type the domain you want, add it to cart by clicking the + symbol, make payment and boom the domain is yours.

Then you cana dd this domain to the cloudflare account by reading the above step.
When you click continue on the cloudflare after typing your domain, it will take you to "Add DNS Records" section, From which i want you to choose the recommended option (Quick scan for DNS records).
After that it will take you to a Plan selection page... I want you to select Free Plan (Yes it's there look for it)

You will be taken to review DNS page which will look something like this.... Click on "continue to Activation" button at the bottom of this screen.

It will take you to the last step which is to update your Nameservers, which you can do via Porkbun dashboard or your providers dashboard (Godaddy,Namecheap,Dynadot, etc)

You will see an option to edit your porkbun domain's nameserver when you hover over it and see NS on the right side below the domain name as shown below...

Click on NS and you will see your default nameservers from Porkbun But you will need to delete them and update it to 2 Nameservers given by Cloudflare in earlier step and it will look like this --

Go back to cloudflare and After you click continue you will see a warning like this below the same table...

You can click on "check nameservers now" and wait for a few hours or Until you get an email from cloudflare.... after which your dashboard will look like this...

Now from the left side of the dashboard go to the Email section and it will look like this ... Click on the Email Routing option...

You will need 2 things to be entered here, The one at the top is what you want, to be your new email address to be... [email protected] and the one below is your current existing google email id where you will receive your emails sent to the above email id.

Some users may need to verify their email ids before getting to next step but once you do... it will show you the DNS edit steps that you need to carry out by yourself and start receiving emails on the new domain email.

You need to delete the records that are shown in the conflicting section, please make sure you don't have any active projects live on the domain before tweaking such sensitive DNS records, once you delete them you will be able to press the "add records and enable" button after which the Email routing screen will look like this to you...

Congratulations.....you did the first half of this job and are now able to receive new emails to [email protected] go ahead, send a test email to your new domain email id and it will be received into your said gmail id which you put in the above section...

After this you would need to also need to enable an App apssword for you gmail to be able to send emails... you can do this via this link... https://security.google.com/settings/security/apppasswords you will need to again login via password for this to work and this will take you to the window shown below---

After you click on create you will be shown your password, please copy this somewhere as you will need this in next steps...

After this open a new tab and go to gmail.com and click on the settings icon to your right...and click on see all settings button.

In this section click on the accounts Tab and go to the send email as section and click on option to add another email address...

click on add another email address and enter the Name that you wants receivers to see as well as the email id that we set at the cloudflare's side i.e [email protected] please don't forget to untick the "Treat as an alias" button...

After this you will be taken to a window where you have to setup the smtp address and ports and the username of the email address.... Here's what to enter -- server name as shown, your gmail address fully including @gmail.com at end and the password we generated as app password in earlier step... keep the tick mark as TLS (Recommended option) and click on add account

After that you will see a confirmation dialog like this one –

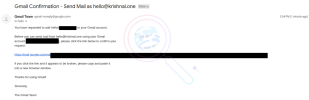
This is how the email would look like --

This is how the email would look like... click on the link and it would take you to another confirm dialog where you just have to click confirm.

After which it will take you to this screen.....

After this go back to your cloudflare overview dashboard and click on left pane on the DNS section which will show you your Domain's DNS records after which you will have to add a new record by clicking on the blue button which says "Add Record"

In the Type dropdown menu choose TXT and then in the name enter @ and in the content section enter this "v=spf1 include:_spf.mx.cloudflare.net include:_spf.google.com ~all" After this choose TTL as Auto.
Go to your gmail and click on compose... in the From section choose the email from the dropdown from which you want to send the email as... and send it, The receiver will get the email from your new email and you're done.

How to get [email protected] Email address or unlimited such emails for free?
But first let's talk about Requirements meaning what you're gonna need to set this up.
1) A Domain Name
2) A Cloudflare account
3) A Gmail Account
For most of you here you will already be having number 1 and 3 but not number 2 but hey don't worry it's very easy and intuitive to get a free account at any of the service mentioned above.
Once you make a free cloudflare account, you need to go to "Onboard a domain" section, here you need to enter your domain and click continue.
For those of you who don't have a domain, you can get it from anywhere, my favourite provider is Porkbun so i am gonna show you how to get a name from porkbun, you just type the domain you want, add it to cart by clicking the + symbol, make payment and boom the domain is yours.
Then you cana dd this domain to the cloudflare account by reading the above step.
When you click continue on the cloudflare after typing your domain, it will take you to "Add DNS Records" section, From which i want you to choose the recommended option (Quick scan for DNS records).
After that it will take you to a Plan selection page... I want you to select Free Plan (Yes it's there look for it)
You will be taken to review DNS page which will look something like this.... Click on "continue to Activation" button at the bottom of this screen.
It will take you to the last step which is to update your Nameservers, which you can do via Porkbun dashboard or your providers dashboard (Godaddy,Namecheap,Dynadot, etc)
You will see an option to edit your porkbun domain's nameserver when you hover over it and see NS on the right side below the domain name as shown below...
Click on NS and you will see your default nameservers from Porkbun But you will need to delete them and update it to 2 Nameservers given by Cloudflare in earlier step and it will look like this --
Go back to cloudflare and After you click continue you will see a warning like this below the same table...
You can click on "check nameservers now" and wait for a few hours or Until you get an email from cloudflare.... after which your dashboard will look like this...
Now from the left side of the dashboard go to the Email section and it will look like this ... Click on the Email Routing option...
You will need 2 things to be entered here, The one at the top is what you want, to be your new email address to be... [email protected] and the one below is your current existing google email id where you will receive your emails sent to the above email id.
Some users may need to verify their email ids before getting to next step but once you do... it will show you the DNS edit steps that you need to carry out by yourself and start receiving emails on the new domain email.
You need to delete the records that are shown in the conflicting section, please make sure you don't have any active projects live on the domain before tweaking such sensitive DNS records, once you delete them you will be able to press the "add records and enable" button after which the Email routing screen will look like this to you...
Congratulations.....you did the first half of this job and are now able to receive new emails to [email protected] go ahead, send a test email to your new domain email id and it will be received into your said gmail id which you put in the above section...
2nd half of this guide will tell you how to send emails from your domain email id such that the receiver will see [email protected] as the sender's address...
For our next step you need to first add a security layer to you google account called as 2 step verification which makes your account more secure and safe from hacking or password leaks... go to this link to do it... https://myaccount.google.com/signinoptions/two-step-verification after which your account will look like this --After this you would need to also need to enable an App apssword for you gmail to be able to send emails... you can do this via this link... https://security.google.com/settings/security/apppasswords you will need to again login via password for this to work and this will take you to the window shown below---
After you click on create you will be shown your password, please copy this somewhere as you will need this in next steps...
After this open a new tab and go to gmail.com and click on the settings icon to your right...and click on see all settings button.
In this section click on the accounts Tab and go to the send email as section and click on option to add another email address...
click on add another email address and enter the Name that you wants receivers to see as well as the email id that we set at the cloudflare's side i.e [email protected] please don't forget to untick the "Treat as an alias" button...
After this you will be taken to a window where you have to setup the smtp address and ports and the username of the email address.... Here's what to enter -- server name as shown, your gmail address fully including @gmail.com at end and the password we generated as app password in earlier step... keep the tick mark as TLS (Recommended option) and click on add account
After that you will see a confirmation dialog like this one –
This is how the email would look like --
This is how the email would look like... click on the link and it would take you to another confirm dialog where you just have to click confirm.
After which it will take you to this screen.....
After this go back to your cloudflare overview dashboard and click on left pane on the DNS section which will show you your Domain's DNS records after which you will have to add a new record by clicking on the blue button which says "Add Record"
In the Type dropdown menu choose TXT and then in the name enter @ and in the content section enter this "v=spf1 include:_spf.mx.cloudflare.net include:_spf.google.com ~all" After this choose TTL as Auto.
Time to test sending Emails via your New Email id--
Go to your gmail and click on compose... in the From section choose the email from the dropdown from which you want to send the email as... and send it, The receiver will get the email from your new email and you're done.
Important Notes
- Make sure to keep your app password secure and never share it
- DNS changes can take up to 48 hours to propagate fully
- Always verify your email settings before making changes to DNS records
- Keep your Cloudflare and Google accounts secure with strong passwords
- If you get stuck at any phase feel free to reply and i will answer it to the best of my ability.
Attachments

Last edited: